Fire Alarm Manual Stations⁚ A Comprehensive Guide
This guide provides a thorough overview of manual fire alarm pull stations, covering various types, mechanisms, manufacturers, installation, maintenance, and integration with fire alarm systems․ We explore features, specifications, and relevant codes and regulations to ensure optimal fire safety․
Types of Manual Pull Stations
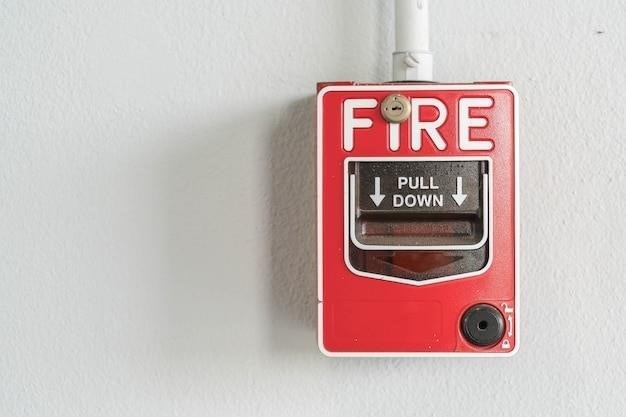
Manual pull stations, the readily identifiable red boxes found in almost every building, come in various types, each designed to meet specific needs and environments․ A primary categorization distinguishes between single-action and dual-action mechanisms․ Single-action stations require only a single pull to activate the alarm, while dual-action stations necessitate a more deliberate two-step process, reducing the likelihood of accidental triggering․ This distinction is crucial for minimizing false alarms․ Beyond this fundamental difference, variations exist in features like weatherproofing for outdoor use, tamper resistance for high-security locations, and addressable capabilities for precise location identification within a larger system․ Manufacturers such as NOTIFIER, Edwards, Simplex, and Wheelock offer a range of models, each with unique design elements and certifications․ The choice of pull station type depends heavily on factors such as building codes, the specific requirements of the fire alarm system, and the environment where the station will be installed․ Understanding these distinctions is key to selecting the appropriate manual pull station for a given application․
Single-Action vs․ Dual-Action Mechanisms
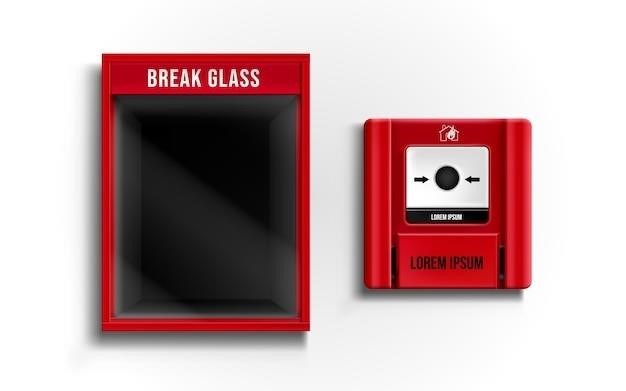
The core operational difference between single-action and dual-action manual pull stations lies in the number of actions required to activate the alarm․ Single-action stations, as their name suggests, initiate an alarm with a single pull of the lever․ This simple mechanism is straightforward and easy to understand, making it suitable for locations where quick alarm activation is paramount․ However, this simplicity also increases the risk of accidental triggering, which can lead to unnecessary evacuations and system disruptions․ Dual-action pull stations, conversely, demand a more deliberate two-step activation process․ This often involves an initial pull followed by a secondary action, such as breaking a glass element or rotating a lever further․ This extra step significantly reduces the chances of accidental activation․ The choice between single-action and dual-action mechanisms depends on the specific application and priorities of the building’s safety plan․ High-traffic areas or locations prone to accidental contact might benefit from the added security of a dual-action system, while locations requiring rapid alarm response might favor the speed of a single-action mechanism․ Both types play vital roles in fire safety, offering distinct advantages based on their operational characteristics․
Common Manufacturers and Models
Several prominent manufacturers dominate the market for fire alarm manual pull stations, each offering a range of models with varying features and specifications․ Notifier, a well-known player, provides intelligent pull stations like the NBG-12LXP, compatible with their ONYX Series panels․ Edwards Signaling offers a variety of models, including the EST 270A-DPO, EST 270A-SPO, and EST 270P-SPO, catering to different needs and budgets․ Sigcom’s SG and SGX series are popular choices, renowned for their reliability and use in diverse environments, from commercial buildings to military bases․ Wheelock provides die-cast metal pull stations in both single and dual-action configurations, highlighting durability․ Potter Electric Signal Company, based in St․ Louis, Missouri, also offers a comprehensive line of die-cast pull stations․ Resideo contributes with their ADA-compliant manual pull station, featuring aluminum die-cast construction and key reset․ Simplex offers weatherproof options such as the INT2099-9138, demonstrating the breadth of available models․ This list isn’t exhaustive, but it represents a cross-section of major manufacturers and the variety of models available, each designed to meet specific fire safety requirements and installation preferences․ The choice of manufacturer and model should always align with building codes and the overall fire alarm system design․
Features and Specifications of Popular Models
Popular manual pull station models showcase a variety of features designed for diverse applications and environments․ The Notifier NBG-12LXP, for example, stands out as an intelligent pull station, offering advanced capabilities for integration with sophisticated fire alarm systems․ Edwards’ EST series often incorporates features like corrosion-inhibited surfaces and durable construction materials for longevity․ Sigcom’s SG and SGX models emphasize reliability and are frequently found in high-stakes environments requiring robust performance․ Wheelock’s pull stations are known for their high-quality die-cast metal construction․ Resideo’s model prioritizes ADA compliance and ease of use․ Simplex’s weatherproof options highlight the importance of environmental protection․ Specific specifications such as voltage ratings, amperage, contact types (SPST, DPDT), and mounting options vary across models․ Some feature key reset mechanisms for controlled testing and maintenance․ Dual-action models offer increased tamper resistance compared to single-action designs․ The selection of features and specifications should be guided by the specific requirements of the building and the overall fire alarm system design, taking into account factors such as environmental conditions and the need for enhanced security or accessibility features․
Installation and Mounting Requirements
Proper installation of fire alarm pull stations is crucial for effective fire safety․ Building codes and regulations dictate specific mounting heights and locations to ensure accessibility and visibility․ Pull stations are typically wall-mounted, often in easily accessible locations within hallways, stairwells, and other common areas․ The exact height requirements may vary depending on local codes and the specific needs of the building, but generally aim for optimal visibility and ease of access for all occupants, including those with disabilities․ Manufacturers’ instructions should be followed meticulously during installation to ensure proper electrical connections and secure mounting․ Using appropriate back boxes and ensuring proper grounding are essential aspects of safe installation․ Regular inspections are necessary to verify that the pull stations remain securely mounted and that there is no obstruction hindering access․ Improper installation can compromise the system’s effectiveness and create safety hazards․ Consideration should be given to potential environmental factors, such as weather exposure for outdoor installations, which might influence the selection of appropriate enclosure types and mounting hardware․ Compliance with all relevant codes and regulations is paramount to ensure that the fire alarm system operates effectively in the event of an emergency․
Maintenance and Testing Procedures
Regular maintenance and testing of fire alarm pull stations are vital for ensuring their reliable operation․ A comprehensive maintenance program should include visual inspections to check for any signs of damage, tampering, or corrosion․ These inspections should be conducted at least annually, or more frequently in high-traffic areas or harsh environments․ Functional testing should also be performed regularly, typically monthly or quarterly, to verify that the pull station activates the alarm system correctly․ This involves actuating the pull station to simulate an alarm activation and confirming that the alarm signals are received and processed by the fire alarm control panel․ Documentation of all maintenance and testing activities is crucial, recording any issues found and the actions taken to resolve them․ Any repairs or replacements should be carried out by qualified technicians using approved parts and procedures․ Maintaining accurate records not only ensures the system’s functionality but also provides evidence of compliance with relevant regulations and safety standards․ Neglecting maintenance can lead to malfunctions, delays in alerting emergency services, and potential endangerment of building occupants․ A proactive approach to maintenance is crucial for preserving the life-saving capabilities of the fire alarm system․
Choosing the Right Pull Station for Your Needs
Selecting the appropriate fire alarm pull station involves careful consideration of several factors․ The type of building, its occupancy, and the specific requirements of the fire alarm system all play a crucial role․ For instance, a high-traffic commercial building might necessitate durable, tamper-resistant pull stations, potentially with features like vandal-resistant enclosures․ Conversely, a smaller residential building might require a simpler, more cost-effective model․ Environmental conditions also influence the choice․ Outdoor locations necessitate weatherproof pull stations to withstand exposure to rain, snow, and extreme temperatures․ The compatibility of the pull station with the existing fire alarm system is paramount․ Addressable pull stations offer precise location identification, aiding in rapid emergency response, while conventional models provide a simpler, more cost-effective solution․ Consider factors such as ease of installation and accessibility for people with disabilities․ ADA compliance is a critical aspect in many regions, mandating appropriate placement and design to ensure inclusivity․ Finally, budget constraints often dictate the selection process․ While advanced features enhance safety, a balance must be struck between functionality and cost-effectiveness․ Careful evaluation of these factors ensures the selection of a pull station that effectively contributes to the overall fire safety strategy of a building․
Codes and Regulations for Manual Pull Stations
Adherence to building codes and regulations is paramount when installing and maintaining manual fire alarm pull stations․ These regulations vary depending on location and building type, but common standards exist across jurisdictions․ National Fire Protection Association (NFPA) standards, such as NFPA 72, provide comprehensive guidelines for fire alarm systems, including pull station placement, spacing, and testing requirements․ Local fire codes often adopt or augment these standards, specifying additional requirements based on specific regional hazards and building codes․ Regulations often dictate the minimum number of pull stations required based on building size, occupancy, and layout․ Placement is critical, with codes usually mandating easily accessible locations, free from obstructions, and clearly visible to building occupants․ The height of pull station mounting is frequently specified to ensure accessibility for all users, including those with mobility limitations․ Regular testing and maintenance are mandated to ensure proper functionality․ These regulations may involve periodic inspections, functional testing, and record-keeping to demonstrate compliance․ Failure to comply with codes and regulations can result in fines, legal liabilities, and compromised building safety․ Therefore, understanding and adhering to the relevant codes and regulations are essential for responsible fire safety management․
Integration with Fire Alarm Systems
Manual pull stations are integral components of a building’s fire alarm system, seamlessly integrating to trigger alarms upon activation․ The integration method varies depending on the system type⁚ conventional or addressable; In conventional systems, pull stations are wired to the fire alarm control panel, initiating a general alarm signal․ This simpler approach offers cost-effectiveness but lacks precise location identification of the activated station․ Addressable systems offer superior functionality․ Each pull station has a unique address, enabling the control panel to pinpoint the exact location of the alarm activation, facilitating faster and more targeted emergency response․ This precise location information is crucial for efficient evacuation and emergency services deployment․ The integration process involves careful wiring and configuration to ensure reliable signal transmission and accurate alarm activation․ Proper grounding and circuit protection are essential to prevent electrical hazards and ensure system integrity; Regular testing verifies seamless integration, ensuring the pull station reliably initiates the appropriate alarm sequence and provides accurate location data to the control panel․ Effective integration requires experienced technicians to properly install, wire, and test the system components for optimal performance and compliance with safety standards․
Advanced Features in Modern Pull Stations

Modern fire alarm pull stations go beyond basic alarm initiation, incorporating advanced features enhancing safety and efficiency․ Some models include built-in tamper switches, immediately alerting authorities to any unauthorized attempts to disable or damage the station․ This proactive measure safeguards the system’s integrity and ensures reliable operation during emergencies․ Intelligent addressable pull stations provide precise location information to the fire alarm control panel, enabling faster and more effective emergency response․ This real-time location data significantly improves evacuation efficiency and facilitates targeted emergency service deployment, minimizing response times․ Wireless connectivity is emerging, eliminating the need for extensive wiring․ Wireless pull stations transmit alarm signals via radio frequency, simplifying installation and reducing costs, particularly in large or complex buildings․ Some advanced models incorporate supervisory features, continually monitoring the station’s status and alerting the control panel to any malfunctions or tampering․ This proactive monitoring enhances system reliability and ensures continuous operational readiness․ These advanced features contribute to a more sophisticated and responsive fire alarm system, significantly improving building safety and emergency response capabilities․
Troubleshooting and Repair
Troubleshooting a malfunctioning manual pull station begins with visual inspection․ Check for obvious damage, loose connections, or signs of tampering․ A simple test involves activating the pull station and observing the fire alarm system’s response․ If the alarm doesn’t sound, verify power supply to the station and the overall system․ Examine wiring connections for any breaks or loose terminals, ensuring secure connections․ If the problem persists, check the station’s internal components, such as the switch mechanism, for any damage or wear․ Consult the manufacturer’s documentation for specific troubleshooting steps and diagrams․ For advanced troubleshooting, specialized tools and expertise may be needed․ Always prioritize safety when working with fire alarm systems; de-energize the system before performing any repairs or maintenance․ If you’re unsure about any aspect of troubleshooting or repair, contact a qualified fire alarm technician․ Improper repairs can compromise the system’s functionality and safety․ Regular preventative maintenance, including testing and inspections, minimizes the likelihood of malfunctions, prolonging the life of your fire alarm pull stations and ensuring system reliability during critical situations․ Remember, a properly functioning fire alarm system is crucial for building safety․